The Apache webserver is an opensource and popular HTTP web server that continues to enjoy a massive market share in the hosting industry. It ships with loads of features including module enhancements, multi-protocol support, simplified configuration, and multi-language support to mention just a few.
Read Also: How to Install Nginx on CentOS 8
In this guide, we will walk you through the installation of the Apache webserver on CentOS 8 and RHEL 8 with a Virtual Host environment. At the time of writing this tutorial, the latest version of Apache is Apache 2.2.43.
Installing Apache Web Server
To get started, first update your CentOS 8 or RHEL 8 system package list using the following dnf command.
$ sudo dnf update
Once the update is complete, install Apache webserver by executing the following command.
$ sudo dnf install httpd
Once installed, you can verify the version of Apache by running the rpm command.
$ rpm -qi httpd

The command prints out an array of information such as the version, release date, build and architecture of the package.
To start the Apache HTTP web service, run the systemctl command.
$ sudo systemctl start httpd
To confirm if the service is running, execute.
$ sudo systemctl status httpd

From the output, the ‘active’ status in green indicates that the Apache webserver is up and running.
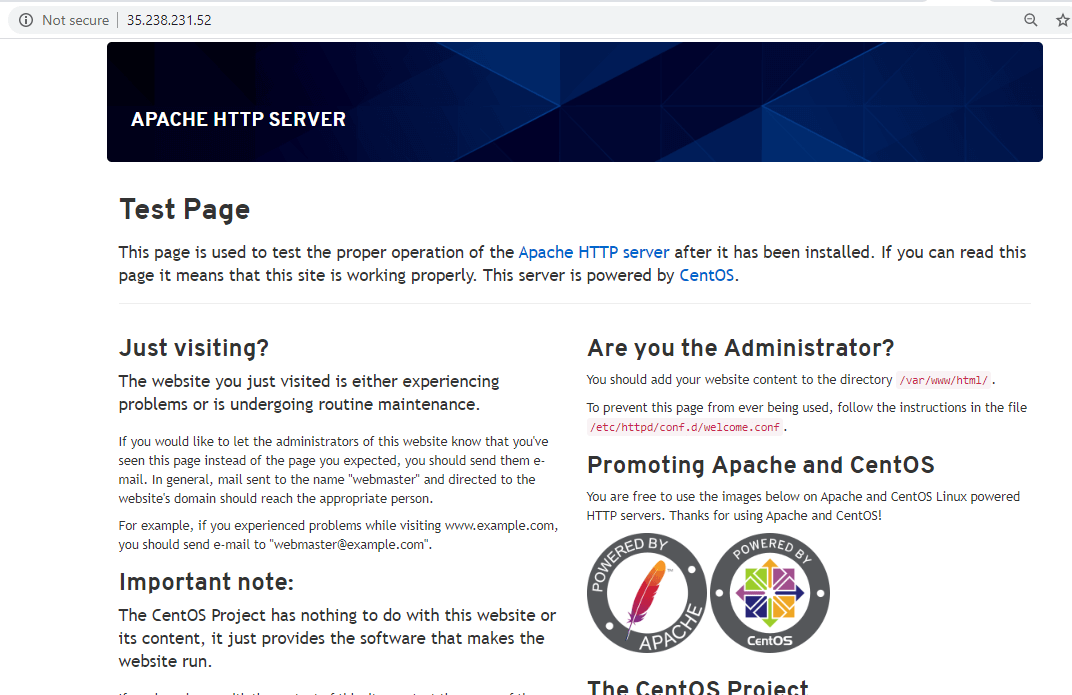
To clear any doubts that the webserver is running, request a test page from Apache by browsing your server’s IP address or domain name as shown.
http://server-ip
You can obtain your server IP by running the ifconfig command. If your server is hosted on the cloud, you can obtain the public IP by running the curl command.
$ curl ifconfig.me
OR
$ curl -4 icanhazip.com

When you browse the server’s IP address, you should get the following web page displayed.

This is a sure confirmation that the webserver is running.
Managing Apache Webserver
With Apache installed and running, you can use the systemctl inspection tool to manage Apache.
For example, to stop Apache, run the command:
$ sudo systemctl stop httpd
To start the service once again, execute:
$ sudo systemctl start httpd
If you have made changes to any of its configuration files and you need to restart to apply the changes, execute the command:
$ sudo systemctl restart httpd
Restarting the service usually causes a service disruption. A better alternative is to simply reload without any interruption with the connection.
$ sudo systemctl reload httpd
To start the Apache web server automatically upon booting or rebooting run the command below. This will ensure Apache starts automatically without your intervention.
$ sudo systemctl enable httpd
If you choose not to start the service automatically on boot, run:
$ sudo systemctl disable httpd
Setting Up Apache Virtual Hosts
By default, Apache web server is configured to serve or host only one website. If you want to host just one website, then this step is not required. But in the event you plan to host multiple domains on your server, then you need to configure Apache virtual hosts.
A virtual host is a separate file that contains configurations that allow you to set up a separate domain from the default one. For this guide, we will set up a virtual host for the domain crazytechgeek.info.
The default virtual host is located at the /var/www/html directory. This works only for a single site. To create a separate virtual host for our domain, we will create another directory structure within the /var/www directory as shown.
$ sudo mkdir -p /var/www/crazytechgeek.info/html
Additionally, you can also create a directory for storing log files.
$ sudo mkdir -p /var/www/crazytechgeek.info/log
Next, edit the file permissions use the $USER environment variable as shown.
$ sudo chown -R $USER:$USER /var/www/crazytechgeek.info/html
Also, adjust the permissions of the webroot directory as shown.
$ sudo chmod -R 755 /var/www
Next, create a sample index.html file as shown.
$ sudo vim /var/www/crazytechgeek.info/html/index.html
Hit the letter 'i' on the keyboard and paste some sample content as shown which will be displayed on the web browser when testing the virtual host.
<html>
  <head>
    <title>Welcome to crazytechgeek.info!</title>
  </head>
  <body>
    <h1>Success! The crazytechgeek.info virtual host is up and perfectly working!</h1>
  </body>
</html>
Save and exit the configuration file.
With the sample index file and site directory created, you can now proceed and create the virtual host file. The virtual host file will contain your domain’s site configuration and instruct Apache how it will respond to clients’ requests.
The virtual host file will contain your domain’s site configuration and instruct Apache how it will respond to clients’ requests. But proceeding, you need to create 2 directories: the sites-available and sites-enabled directories.
The virtual host file will be stored in the sites-available directory while the sites-enabled the directory will contain the symbolic link to the virtual host.
Create both directories as shown.
$ sudo mkdir /etc/httpd/sites-available
$ sudo mkdir /etc/httpd/sites-enabled
Next, modify the Apache web server’s main configuration file and instruct Apache where to locate the virtual host inside the sites-enabled directory.
$ sudo vim /etc/httpd/conf/httpd.conf
Append the line as shown at the very end of the configuration file.
IncludeOptional sites-enabled/*.conf
Save and exit.
Now create a virtual host file as shown:
$ sudo vim /etc/httpd/sites-available/crazytechgeek.info
Paste the content below and replace crazytechgeek.info with your own domain name.
<VirtualHost *:80>
    ServerName www.crazytechgeek.info
    ServerAlias crazytechgeek.info
    DocumentRoot /var/www/crazytechgeek.info/html
    ErrorLog /var/www/crazytechgeek.info/log/error.log
    CustomLog /var/www/crazytechgeek.info/log/requests.log combined
</VirtualHost>
Save and exit the file.
Now enable the virtual host file by creating a symbolic link in the sites-enabled directory.
$ sudo ln -s /etc/httpd/sites-available/crazytechgeek.info.conf /etc/httpd/sites-enabled/crazytechgeek.info.conf
Adjusting SELinux Permissions for Virtual Hosts
CentOS 8 and RHEL 8 ships with SELinux which is a security module for fortifying the Linux system’s security. Since you configured a custom log directory in the previous step, you need to update some SELinux policies to instruct the Apache webserver to write to the directory.
There are 2 approaches in adjusting SELinux Apache policies: Adjusting adjusting policies universally & the policies on a directory. The latter is preferred because it is more preferred.
Adjusting SELinux Policies on a Directory
Editing SELinux permissions for the log directory gives you absolute control over the Apache’s webserver’s policies. This method is quite lengthy and requires you to manually configure context type for additional directories specified in the virtual host configuration file.
Before getting started, first confirm the context type assigned to the log directory by SELinux:
$ sudo ls -dlZ /var/www/crazytechgeek.info/log/
The output should be similar to what we have below.

From the output, the set context is httpd_sys_content_t. This indicates that the webserver can only read files in the log directory. You need to change this context to httpd_log_t to enable Apache to generate and add log entries to the directory.
Therefore, execute the command:
$ sudo semanage fcontext -a -t httpd_log_t "/var/www/crazytechgeek.info/log(/.*)?"
If you happen to get the error below “semanage: command not found”.
It implies that the packages that provide for the semanage command are not installed. To fix this error, you need to install those packages. But first, check which packages provide for semanage command by running:
$ sudo dnf whatprovides /usr/sbin/semanage
The output gives us the package that provides for semanage, which is policycoreutils-python-utils.
Now install the package as shown using the DNF package manager.
$ sudo dnf install policycoreutils-python-utils
The command for changing the context should now work.
$ sudo semanage fcontext -a -t httpd_log_t "/var/www/crazytechgeek.info/log(/.*)?"
To save the changes and make them persistent, issue the restorecon command as shown:
$ sudo restorecon -R -v /var/www/crazytechgeek.info/log
You can confirm the changes by once again running the command:
$ sudo ls -dlZ /var/www/crazytechgeek.info/log/

Be sure to note that the context type has changed to httpd_log_t as seen in the output.
Restart Apache for the changes to be applied.
$ sudo systemctl restart httpd
You can now confirm if Apache is saving log files in the log directory by listing its contents as shown:
$ ls -l /var/www/crazytechgeek.info/log/
You should be able to see two log files as shown: error log and request log files.

Testing Apache Virtual Host
Lastly, you need to be sure that the Apache webserver is serving your virtual host file. To do this, open your browser and go to your server’s IP address or domain name:
http://domain-name

Perfect! This indicates that all went well and our virtual host is being served as expected.
Conclusion
In this guide, we have learned how to install the Apache webserver on CentOS 8 and RHEL 8 and also how to configure a virtual host file to serve content for an extra domain. Feel free to configure multiple virtual host files as you deem fit to accommodate additional domains.
If you want to set up a complete hosting stack, I recommended you install a LAMP stack on CentOS 8.


Hi,
Thank you for this documentation, so this command can not find to file problem:
Change to command thats true:
best regards.